GoDaddy has been in the hosting business for years, but it’s not until fairly recently that they’ve added a managed WordPress hosting option to their suite of products. GoDaddy’s WordPress hosting is different from the typical cPanel interface that they provide with their shared & cloud hosting. A WordPress-specific plan gives you:
- File permissions & caching that is designed specifically for WordPress sites
- Security monitoring to protect your site from attacks
- Automated backups of your files & database, and 1-click restore
- Staging sites (upgrade)
- Automatic core updates, to keep your WordPress installation secure
- A free, automated migration tool to move your site
For a small, single site, the price for GoDaddy WordPress hosting is currently $2 cheaper/mo. than classic cPanel hosting, plus you get the above features.
NEW: Get WordPress hosting for $4/mo. at GoDaddy
If your website currently resides on a classic hosting plan (using cPanel), but you want to switch to GoDaddy’s WordPress Hosting platform, let’s take a look at the steps involved. For small sites, you could complete the entire process in about 1-2 hours, depending on how much time you spend on testing (which is important, so please don’t skip that part).
Warning: You can only migrate if 1) you are using the self-hosted version of WordPress (not WordPress.com), 2) your site is NOT in maintenance mode or password-protected from the public, and 3) you are NOT using a custom login page (must use wp-login.php)
WATCH: GoDaddy WordPress Hosting Migration Video »
(use links in description to jump sections)
1. Navigate to your Hosting Control Panel
- Once logged in, navigate directly to gateway.godaddy.com -or-
- Click your name in the top-right corner. Click “Visit My Account”. Scroll down to your products, and click “Manage” next to “Managed WordPress.”
- Then click the “Set Up” button within your Managed WordPress Hosting account


2. Choose the Migration Option
- Select “Migrate Your Existing WordPress Site”

3. Enter WordPress Admin & FTP Information
Site Domain
- I recommend leaving the temporary domain selected. This will allow you to test everything before switching over.
Current Site Info
- Site URL: Enter your live site’s domain name
- WordPress Admin Username: Enter the username for any user who has Administrator priveleges
- WordPress Password: Enter the password for the user you chose above
FTP Credentials
- Host Location or IP Address: You get this information from your existing host. It is often
ftp.yoursite.com. Or just use the IP address of your server. - FTP/SFTP Username: Enter your username
- FTP/SFTP Password: Enter your password
- Click “Finish”
Your migration is now in progress. For small sites, it could take as little as 5 minutes. Larger sites could take as long as 2 hours. You’ll receive an email when it’s complete.
Get WordPress hosting for $4/mo.
4. Login to Your Testing Site
- Navigate back to your hosting control panel
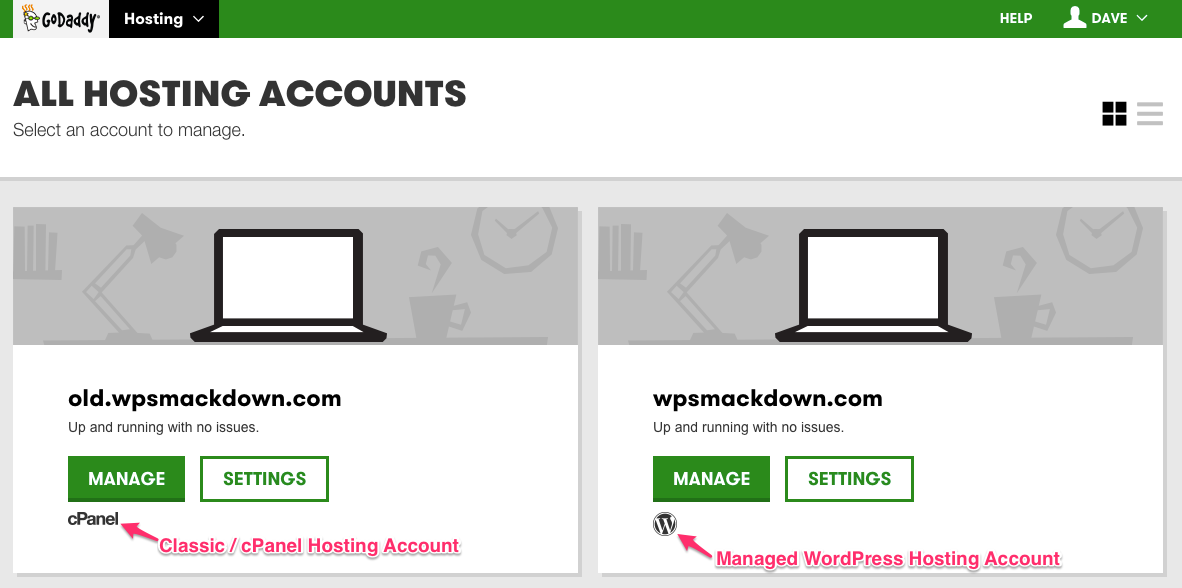
- You’ll see your migrated site listed as
abc123.myftpupload.com. You know this is GoDaddy’s WordPress hosting plan because of the little W icon associated with it. Compare that to the cPanel icon on your old hosting plan.
RELATED: What is myftpupload.com?
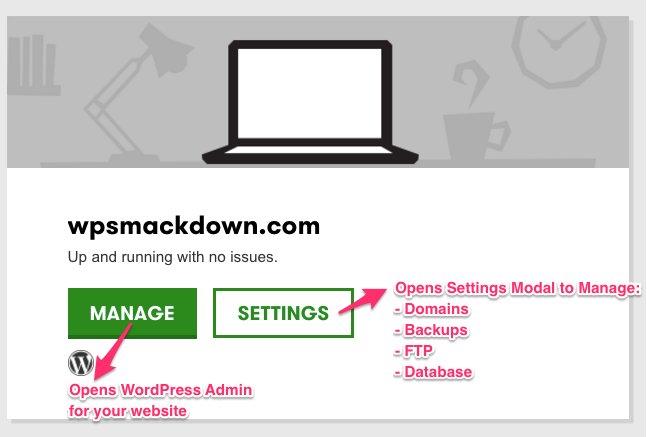
- Click “Manage”
- This opens the WordPress Admin area of your migrated site, in a testing environment
- You will be logged in as “Managed WordPress Migration User,” a temporary user that GoDaddy creates for you
5. Test, test, test!
Before you switch your domain over to your new GoDaddy WordPress hosting platform, you want to make sure everything migrated over properly. In theory, this site should be an exact replica of your existing site. But as you know, technology doesn’t always work that way. Here’s a quick rundown of the things you should be testing. Use this as a starting point, not an exhaustive list. Pull up both sites side-by-side to compare.
In The WordPress Admin
- Is the correct theme activated?
- Are all of my theme options & Customizer settings the same?
- Are all of my posts & pages listed?
- Are all of my comments listed?
- What about any custom post types?
- Are all of my users accounted for? Are they assigned the correct role?
- Does my Media Library contain all images, PDFs and other uploads?
- Are my plugins installed? Are the correct ones activated/deactivated?
The Website Itself
- Does the design look the same?
- Is all functionality working properly? Forms? Ecommerce? Maps? Anything else that you’re relying on a plugin to do?
- Look for missing images
- Are all menus & navigation working properly?
6. Move From Testing to Live
Once you’re finished testing, you are now ready to make your site live. The example I’ll walk you through here is for those moving from GoDaddy’s cPanel/Classic hosting to GoDaddy’s WordPress hosting.
6a. Release Domain From Old Hosting
Before you can assign your domain to your new WordPress hosting, you have to release it from your old hosting account.
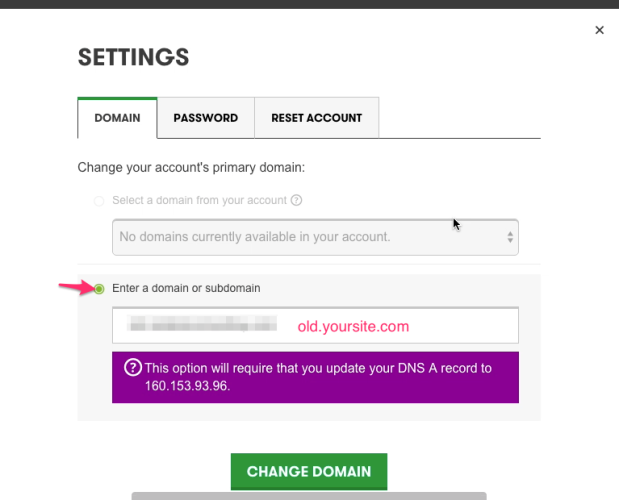
- From your Hosting Control Panel, locate your cPanel hosting, and click “Settings”
- Choose “Enter a domain or sub-domain”
- Type in
old.yourdomain.com - Click “Change Domain”
This frees up your domain name to be used with the GoDaddy WordPress hosting.
6b. Add Domain to New GoDaddy WordPress Hosting
- From your Hosting Control Panel, locate your WordPress hosting, and click “Settings”
- Click “Add Domain”
- Choose “Select a domain from your account”
- Choose your domain from the dropdown
- Check the box to “Make this the primary domain for your account”

Back on your Hosting Control Panel, for your WordPress hosting, you’ll now see your domain name listed. Underneath, it will say “Change domain pending.” It could take anywhere from 10 minutes to a few hours for this to update. Once it has finished, you’ll see “Up and running with no issues.”
Once updated, your new site is live! That wasn’t so bad, was it?
7. Confirm Your Site is Using GoDaddy’s WordPress Hosting
Just to make sure you’re officially on the new platform, there’s an easy test you can do.
- Login to your WordPress admin area
- You should see a “GoDaddy” menu option in both the left navigation, as well as in the admin bar at the top of your screen
- If you see these options, you are using GoDaddy’s WordPress hosting platform

8. Delete the Temporary Migration User
You no longer need the temporary user that GoDaddy created in order to do the migration. Let’s go ahead & delete that account.
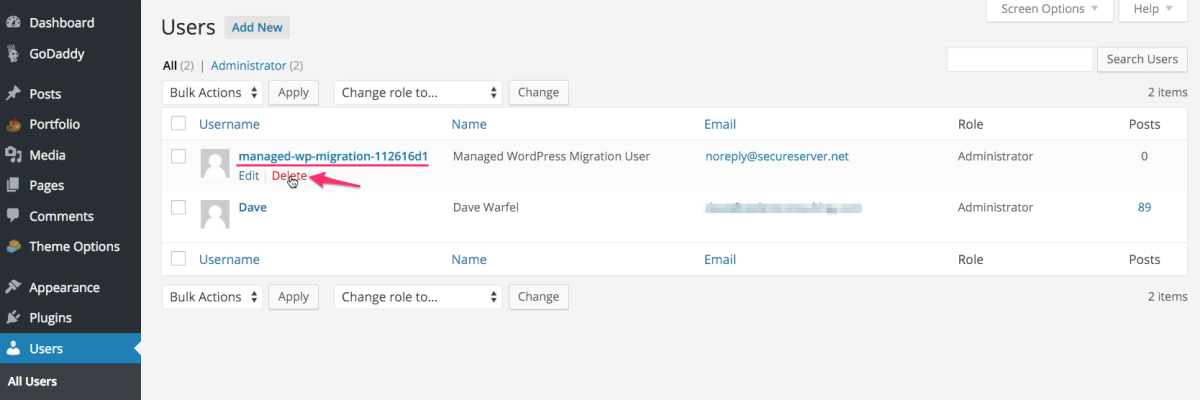
- Navigate to Users > All Users
- Find the “Managed WordPress Migration User”
- Click “Delete”
- You’ll be asked “What should be done with content owned by this user?”
- Technically, there is no content associated with this user, but just to be on the safe side, choose “Attribute all content to:” and select one of your main Admin users.
9. Cancel Your Old Hosting, or Turn Off Auto-Renew
I recommend keeping your old classic GoDaddy hosting account active for a few days, just in case you run into any issues on the new plan, and need to do an emergency switch back. However, once you’re confident that everything is running smoothly on the WordPress hosting platform, make sure you either cancel your old account, or turn off auto-renew, so that you don’t get charged for hosting that you aren’t using.
9a. Cancel Old GoDaddy Hosting


- Navigate to My Account. You should see a list of all your products.
- You’ll see both “Web Hosting” and “Managed WordPress”
- Click on “Web Hosting” to open it up
- Click the “Options” button
- In the bottom left corner, you’ll see a link to “Cancel this account”
If you have several months, or even years, left on your old hosting, it might be worth giving GoDaddy a call. They might be able to offer you a refund. No guarantees, but it’s worth a shot. Do this before you cancel your plan.
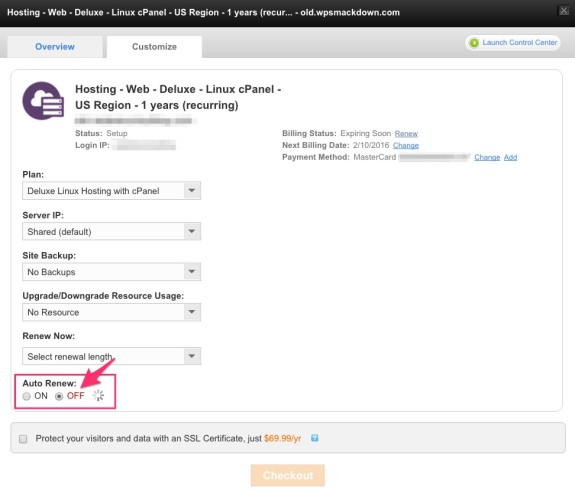
9b. Turn Off Auto-Renew
If your old GoDaddy hosting is expiring soon, or you just prefer to let it expire, here’s how you can ensure that it doesn’t auto-renew.
- Navigate to My Account. You should see a list of all your products.
- You’ll see both “Web Hosting” and “Managed WordPress”
- Click on “Web Hosting” to open it up
- Click the “Options” button
- Click the “Customize” tab at the top
- The very last option on that screen is “Auto Renew.” Click the radio button for “OFF.”
Your changes are automatically saved. When you reach your expiration date, your old hosting account will be canceled, and all files will be deleted. It’s a good idea to grab a backup of everything before canceling your account.
GoDaddy WordPress Hosting Migration Video
I hope you enjoyed this comprehensive guide to migrating your website to the GoDaddy WordPress Hosting platform. If you have any trouble migrating, leave a comment so I can help you out.
We Recommend
https://kinsta.com › wordpress-hosting
Fast and secure infrastructure, worldwide CDN, edge caching, 35 data centers, and enterprise-level features included in all plans. Free site migrations.
https://gravityforms.com › features
Create custom web forms to capture leads, collect payments, automate your workflows, and build your business online. All without ever leaving WordPress.
Leave a Comment