Google Analytics is one of the most popular & powerful analytics platforms in the world… and it’s completely free. There’s very little argument against using it on your site. I’ll be writing a series of articles on how to create a new account & setup Google Analytics, but for the time being, I’ll assume you’ve already done that, and now you’re ready to add Google Analytics to WordPress.
One Size Does Not Fit All
Ultimately, how you decide to add Google Analytics to your WordPress site is up to you. There are several factors you should consider before choosing one of these three methods.
- Option 1 – Install a WordPress plugin
- Option 2 – Add code to your theme (or a custom plugin)
- Option 3 – Use Google Tag Manager (GTM)
Factors to Consider
- Are you a web developer, marketer or business owner? How comfortable are you editing HTML & PHP code?
- Non-technical business owners should probably use a plugin. Web developers or more savvy marketers could benefit from using a custom method.
- Do you run an ecommerce store or sell any products from your website?
- To capture & analyze ecommerce data requires a more advanced setup. There are plugins that can achieve this, but you’ll likely have to purchase premium upgrades, and you’ll still be limited by the functionality of the plugin.
- What kind of data are you reporting on?
- If you only need basic data (sessions, pageviews, top pages, traffic sources, bounce rate, etc.), a Google Analytics plugin might work just fine. For more advanced reporting & custom setup, you might need to add it yourself.
- How much time will you spend analyzing the data?
- If you have a dedicated marketing/analytics person on staff, it might be better to use a custom implementation so you can capture more data, and you’ll have someone to actually do something with that data. If you’re only checking your reports once a month for 10 minutes, you won’t have time for more advanced reports, so you should probably just install a Google Analytics plugin.
With these questions answered, let’s talk about exactly how to add Google Analytics to WordPress.
1. Google Analytics WordPress Plugin
Installing a Google Analytics WordPress plugin is the most basic and simple option. Let’s take a look at the pros & cons:
Pros
- Quick & easy – Be up and running in just a few minutes
- Automatic link/download tracking – Your links & downloads will automatically be added as Events in Google Analytics
- Automatic exclusion of admin users – You don’t have to worry about your traffic skewing your data
- Community support – Using a popular WordPress analytics plugin means thousands of others have had the same questions as you, and you’re likely to find someone out there who can help
- Updates – If Google makes important changes to its analytics code, a simple plugin update will ensure the change is applied. You don’t have to monitor this yourself.
Cons
- Limited customization – You’re stuck with a fairly basic implementation of Google Analytics
- Basic reporting – Because you can’t completely customize your code, you’ll only receive basic analytics data
If you think this is your best option, read on for instructions on setting up our recommended WordPress analytics plugin.
Google Analytics by Yoast
With over 1 million active installs, this is easily the most popular analytics plugin out there. And for good reason. Joost de Valk (also known as “Yoast”) is an online marketer and expert in the field of website optimization. In addition to this plugin, he created the Yoast SEO plugin, which also has over 1 million active installs.

Let’s take a look at the setup…
- In your WordPress admin, navigate to Plugins > Add New
- Search for “google analytics by yoast”
- Click “Install Now”
- Click the link to activate it
General Settings
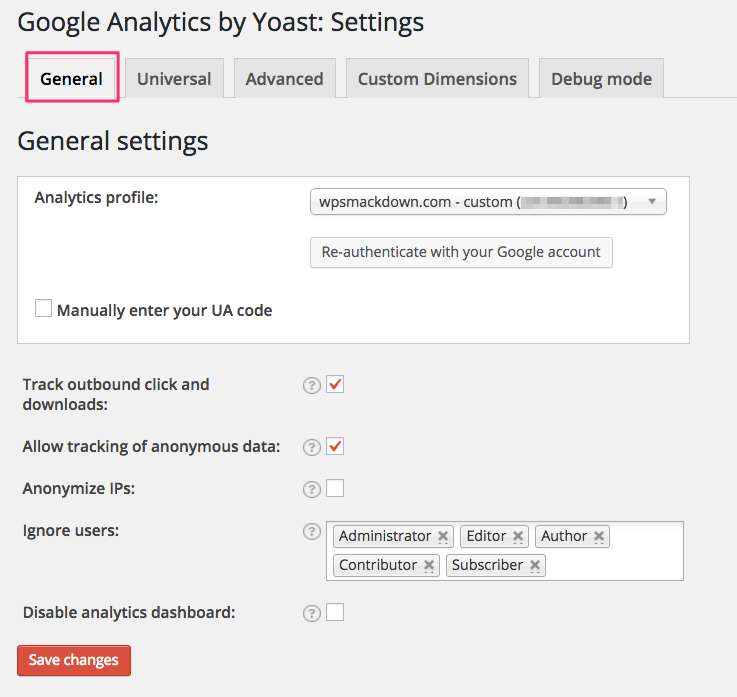
- Analytics Profile – In order for the plugin to work, you need to tell Google which website to send data to. You have two options:
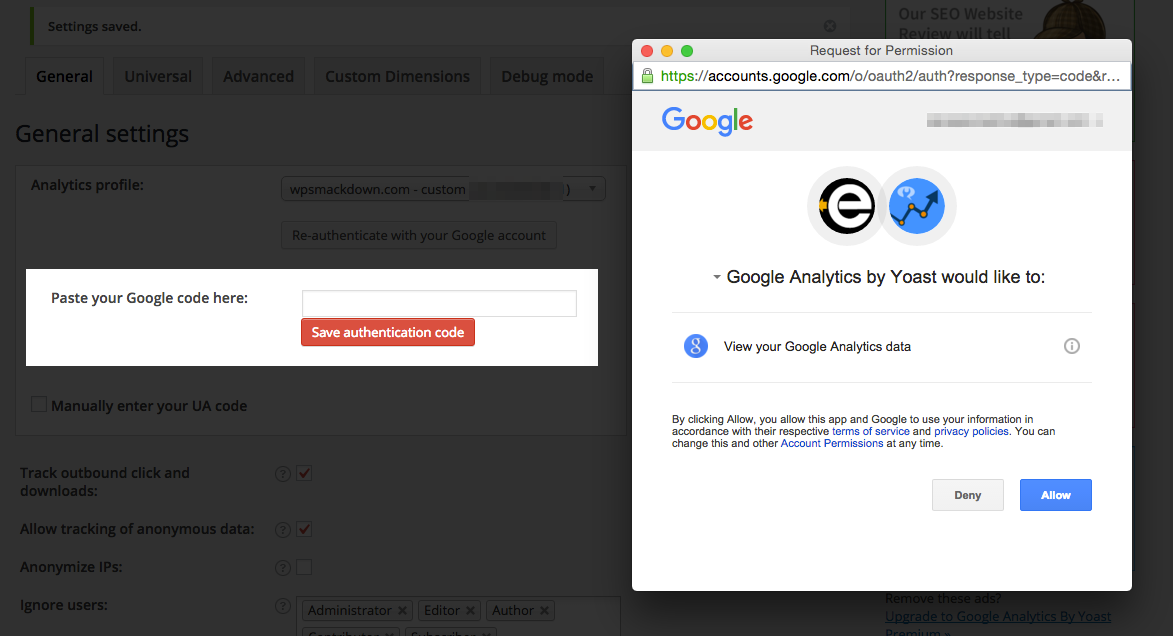
- Authenticate with Google
- Click the “Authenticate with your Google Account” button
- (if you’re not already logged in) Login to the Google account that you setup Analytics with
- Click “Allow” to give the plugin permission to access your account
- Copy the authentication code & paste it into the box on the settings page in your WordPress admin
- Choose the appropriate profile from the dropdown menu*
- Authenticate with Google
- Manually enter your UA code**
- Check the box to “Manually enter your UA code”
- Grab the Tracking ID from your Google Analytics account
![]()
- Paste the Tracking ID into the text box
*Choose any profile for the web property that you are tracking. It doesn’t matter which “profile” you choose, as long as its one of the profiles for the correct “property.”
**If you manually enter your UA code, you won’t be able to use Dashboard Reports within WordPress.
- Track outbound click and downloads – This will add extra data into your analytics account. I recommend turning this on. You’ll be able to see which links on your site were clicked, and what files were downloaded. (NOTE: This only tracks links in the main content section of your pages. It does not track the header, navigation, sidebar or footer links.)
- Allow tracking of anonymous data – This one is entirely up to you. It will send the plugin developer data about how you use the plugin. It helps for fixing issues & further development.
- Anonymize IPs – This is an advanced configuration. I recommend leaving it unchecked, unless you know what it means.
- Ignore users – This one is important. You can tell the plugin not to count your own traffic in your analytics reports. You’ll always want to add “Administrator,” and most likely also add “Editor.” If your site does not have members, I’d probably add all user groups. But if you do allow people to register with your site, or sign-in as a member, you’d want to count all that traffic, so in that case, do not add “Subscriber” here.
- Keep in mind, these user groups will be excluded from your traffic reports for ALL pages on your site. If you run a multi-author blog, think carefully before excluding traffic from “Authors” or “Contributors.”
- Disable analytics dashboard – If you’re not using the analytics dashboard inside of WordPress, go ahead & check this option. It will remove it from your left navigation, and move the “Analytics” tab down near the bottom of your left nav.
Universal Settings

- Enable Universal tracking – This is Google’s newest, and preferred, method of tracking. If you’re starting a new website, you should enable this. If you have an older site which uses the Classic tracking method, follow Yoast’s guide on upgrading to Universal Analytics before you enable this.
- Enable Demographics and Interests Reports for Remarketing and Advertising – This is an advanced feature. Only enable this if you know what it means.
- Enhanced Link Attribution – I recommend you enable this. It modifies the tracking code to allow for more specific tracking of link clicks on your pages. You will also need to enable this from within your Google Analytics account.
Advanced Settings
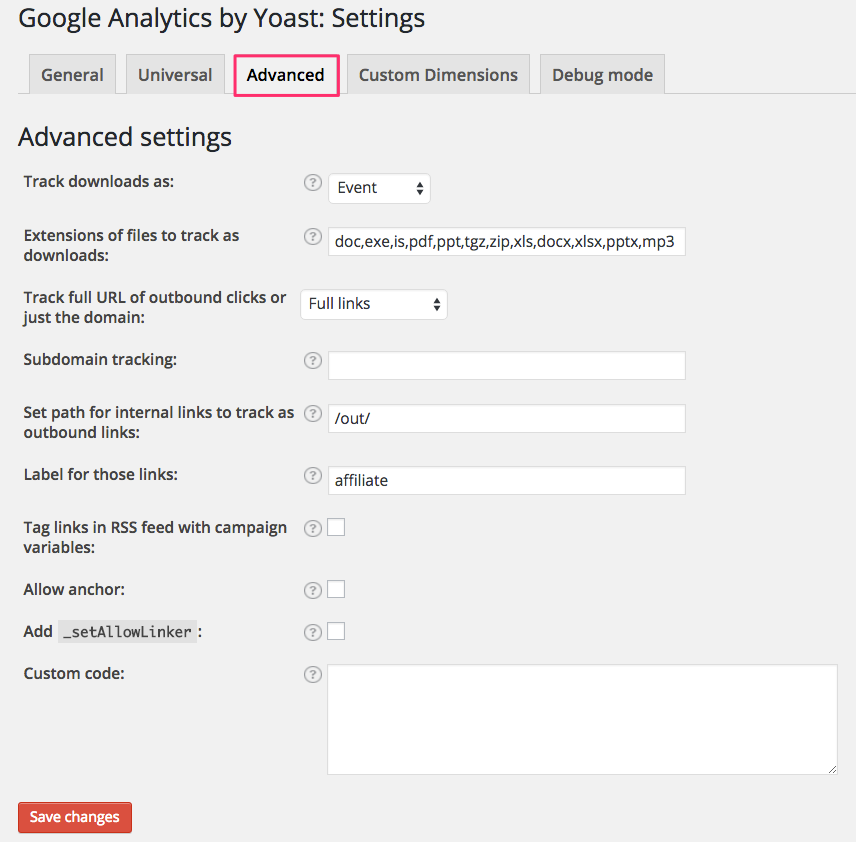
- Track downloads as – I recommend using Event as the tracking method
- Event: Adds download data to Google Analytics under Behavior > Events, which is where download information is best kept
- Pageview: Creates a new pageview for each download. These will appear in Behavior > Site Content, alongside the actual pages (URLs) on your site. Unless you know how to use advanced filtering & segmentation, do not choose this option, as it could inflate your pageview data.
- Extensions of files to track as downloads – This tells the plugin which files you want to count as a “download” in your event tracking. I’ll provide a general list that will cover most scenarios, but you can add additional filetypes. (Ex: add mp4 if you offer video downloads of
.mp4files)doc,exe,pdf,ppt,tgz,zip,xls,docx,xlsx,pptx,mp3
- Track full URL of outbound clicks or just the domain – I prefer to track the entire URL. You can always segment your data to combine all URLs that contain a particular domain.
- Just the domain: escapecreative.io
- Full links: escapecreative.io/add-google-analytics-to-wordpress-3-ways
The other settings on this page are more advanced, and you’ll likely want to keep them all unchecked or blank. However, if you run an affiliate program, you can set a path for internal links that you want to count as outbound links. See my setup in the above image for an example.
That’s it! You really just need to configure these settings one time. Now you’re free to continue building your business, and your analytics data will be there when you can make some time to explore it.
2. Add Google Analytics to Your Theme (or Custom Plugin)
If you need a more custom implementation of the Google Analytics tracking code, or want to capture more data than a plugin offers, this is a good way to go. It’s how we’re implementing Google Analytics here on WP Smackdown, mainly because it allows us to completely customize the tracking script, and capture ALL the data that we want to track. You will need some general HTML/Javascript knowledge if you decide to go this route, but we’ll walk you through it.
Pros
- Capture more data – You can use custom dimensions, adjust your site speed sample rate, make use of plugins, etc.
- Be in complete control – You control the code, 100% of the time. Make updates on your own terms. You’re not reliant on anyone else.
- Programmatically change the code using PHP – Combine the power of WordPress functions with the flexibility of Google Analytics to add data to GA on the fly.
Cons
- Intermediate-level setup – You need a basic understanding of HTML (and PHP, for customizations)
- Knowledge of Google Analytics required – It’s not actually required, but if you want to get the same tracking as most plugins offer, you’ll need to understand how GA works.
- Maintenance – This should be minimal, but from time-to-time, Google or WordPress could update their respective software, and you might have to make some tweaks to your code.
First, A Recommendation
If you’re savvy enough to go this route, you likely have the skills to create a simple custom plugin. I highly encourage you to add your Google Analytics code in a plugin, NOT your theme. Themes are for design & layout, not functionality. You could change themes 5 times in the next 10 years, and you’d want the same analytics tracking on every one.
The Setup
You’ve got a few options where to place the code, but like I just mentioned, a custom plugin is best.
- Custom plugin (recommended)
- Theme’s
functions.phpfile - Theme’s
header.phpfile
Let’s take a look at the code. If go with a custom plugin or functions.php file, you’ll need to create a function and use the wp_head action hook. Otherwise, you can place the <script> directly as-is into your header.php file.
Standard Setup (no customizations)
Here’s what your basic installation will look like. Remember to replace UA-XXXX-Y with your site’s tracking ID.
<script>
	(function(i,s,o,g,r,a,m){i['GoogleAnalyticsObject']=r;i[r]=i[r]||function(){
	(i[r].q=i[r].q||[]).push(arguments)},i[r].l=1*new Date();a=s.createElement(o),
	m=s.getElementsByTagName(o)[0];a.async=1;a.src=g;m.parentNode.insertBefore(a,m)
	})(window,document,'script','//www.google-analytics.com/analytics.js','ga');

	ga('create', 'UA-XXXX-Y', 'auto');
	ga('send', 'pageview');

</script>
Customizations
If all you wanted was the standard setup, you should be using a plugin. So let’s take a look at a few ways to customize the Google Analytics tracking code.
Enhanced Link Attribution
There is very little harm in enabling this, and it can give you further insight into link clicks on your site. If you have multiple links that point to the same URL, or use buttons, menus or actions driven by javascript, you’ll want to enable this. It should be placed in-between the create and send calls. To get the most out of enhanced link attribution, each link should have a unique ID attached to it. — ga('require', 'linkid');
ga('create', 'UA-XXXX-Y', 'auto');
ga('require', 'linkid');
ga('send', 'pageview');
Site Speed Sample Rate
By default, Google only collects 1% of your traffic’s site speed data. If you have a fairly low amount of traffic, you might want to increase this percentage to get a better idea how your site loads for a majority of your users. You’d modify the create call to look like this (if you wanted 50% of user’s site speed to be reported).
ga('create', 'UA-XXXX-Y', {'siteSpeedSampleRate': 50});Custom Dimensions
Aside from the standard data Google Analytics collects, we can tell it to capture data specific to a WordPress site. You can use custom dimensions to capture:
- which categories & tags are most popular
- the post year, to see if people are still engaging with older posts
- which authors are racking up the most pageviews
- and any other data that you can pull from WordPress
I’ll write another article on exactly how to get this data from WordPress and add it to your analytics script, but here’s a basic code sample for tracking categories. You’d place this after any require calls, but before your call to send a pageview.
ga('set', 'dimension1', 'Some Category');NOTE: If you really want to track custom dimensions, this is probably your best option. I believe it is possible to track them with method #3 (GTM), but that includes setting up a data layer, and writing a lot more code.
Half-decent segue into option #3 for adding Google Analytics to WordPress…
3. Add Google Analytics with Google Tag Manager
Our third & final solution is to add Google Analytics using Google Tag Manager (GTM). GTM is a free service offered by Google to manage multiple tags (or scripts) on your website. One of the huge advantages to using GTM is that you don’t need to edit your site’s code, upload files via FTP, etc. to make changes. Marketers love GTM because they don’t have to hunt down a developer to make some changes.
Pros
- Capture more data – You can use custom dimensions, adjust your site speed sample rate, make use of plugins, add click tracking, etc.
- No coding required – Marketers with no understanding of code can implement new tracking
- No FTP or site access needed – You can make changes with a simple login to GTM’s interface. You don’t even need access to WordPress.
Cons
- Small learning curve – You’ll need to familiarize yourself with the GTM interface.
- More than just Google Analytics – There is a lot more functionality than just analytics. If you prefer a method that does just Google Analytics, this might not be for you.
- Knowledge of Google Analytics required – If you want to get the same tracking as most plugins offer, you’ll need to understand GA basics.
The Setup
This basically boils down to two steps. First, we add the Google Tag Manager code to our WordPress site. Then, we login to GTM and setup the Google Analytics tracking.
Google recommends we place the Google Tag Manager code just after the opening <body> tag. Since there isn’t a unified way to insert code here (like there is with the wp_head action hook), we’ll place the code directly in our theme’s header.php file. If you switch themes, just remember to copy the code over to your new theme.
Step 1 – Add Google Tag Manager Code to WordPress
- After setting up your Container in GTM, copy the installation code
- Open your theme’s
header.phpfile - Paste the code after your opening
<body>tag - Save & upload the file to your server
Step 2 – Setup Google Analytics Tracking in Google Tag Manager
- Login to your GTM account
- Create a new tag with the following settings
- Set your trigger to fire on all pages
- Publish your tag
Or just follow along in this simple video…
That just about does it for the 3 best options on how to add Google Analytics to WordPress.
Is there anything I missed? Still confused which one to choose? Post a comment and I’ll help you out.
We Recommend
https://kinsta.com › wordpress-hosting
Fast and secure infrastructure, worldwide CDN, edge caching, 35 data centers, and enterprise-level features included in all plans. Free site migrations.
https://gravityforms.com › features
Create custom web forms to capture leads, collect payments, automate your workflows, and build your business online. All without ever leaving WordPress.
Leave a Comment