
Optimus is a WordPress image compression plugin that does one thing, and does it well. Every image you upload through the Media Library gets optimized on Optimus’ servers. This image compression works with .jpg and .png images, and can save a lot of disk space & bandwidth. Smaller images means decreased page load times, better Google PageSpeed scores, a boost in SEO, and happier visitors altogether. Happy visitors are much more likely to convert, or at least stick around for a bit.
Using a WordPress image compression plugin is also a great idea because of the continual rise of web browsing on smartphones. Visiting an image-heavy site on your phone, over a 4G connection, not only takes much longer to load, but also eats into your data plan. The more you can compress your images, the better the mobile experience you can provide.
The free & premium versions of the Optimus plugin are very similar. You can assume I’m referring to the free version, unless otherwise specified.
Optimus was developed by the folks at KeyCDN, so they know a thing or two about compressing images & optimizing static assets. Their global CDN network is one of the best out there. I use KeyCDN for WP Smackdown, and highly recommend their service.
Optimus Settings
The first thing you’ll want to do is visit Settings > Optimus. There aren’t many options here (which is great), but you’ll want to take a quick look.
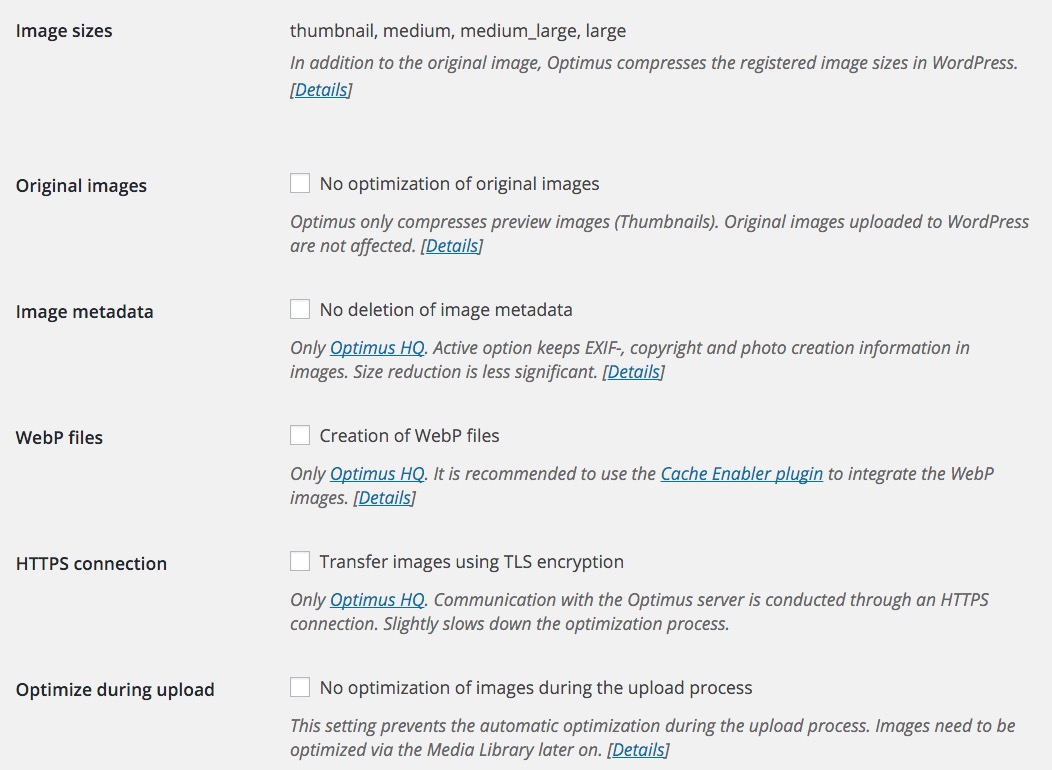
Image Sizes
This setting just confirms which images Optimus recognizes as official sizes. If you’ve created custom image sizes in WordPress, make sure they appear here if you want them to get compressed.
Original Images
Here is where you can disable the compression of the original image being uploaded. Optimus will still compress the image sizes listed above, just not the original image. You can preserve EXIF data in the original image this way.
Image Metadata (PRO only)
If you’d like to keep EXIF, copyright & other image creation data present for all images, you can select this option. The size reduction is less significant if you go this route. Unless you run a photography site or actually use your EXIF data, I recommend leaving this unchecked.
WebP Images (PRO only)
With the pro version of Optimus, you can automatically convert every image into a .webp file. WebP is a new file format by Google that creates images 25-80% smaller in file size, compared to their .png and .jpg counterparts. This will put more strain on the server so your initial uploads will take a little longer.
Using WebP Images
There are two ways to implement .webp images on your site, described here. The recommended method is to use the Cache Enabler Plugin, but instructions are also provided for Apache & NGINX servers. It is recommended to only enable WebP image support if you are actively using it, otherwise you’re putting unnecessary strain on the server.
I recommend using WebP images for your WordPress site. The reduction in file size is significant, and will improve your page load speed.
HTTPS Connection (PRO only)
If you’d like to communicate with the Optimus server using TLS/SSL encryption, check this option. This will also slow down your media uploads slightly. I’d only recommend enabling it if you think you really need your image data encrypted.
Optimize During Upload
Checking this option will not compress your images as you upload them, and you’ll have to manually compress them later on using the bulk image optimizer. Most of you will want to leave this unchecked.
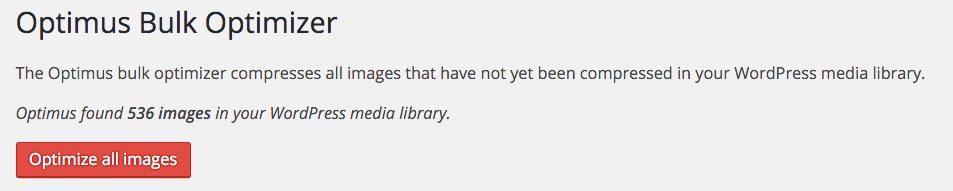
Bulk Optimize Images
The Optimus plugin also comes with a bulk image optimizer. If your site already contains 100s of images, you can still go back & compress them using the bulk feature.
- Login to your WordPress admin area
- Navigate to Tools > Optimize all images
- Optimus tells you how many non-optimized images it found in your Media Library
- Click the Optimize all images button
WordPress Image Compression
Now that you know how to set things up, let’s take a look at the actual compression of images. After all, what good is an image compression plugin if it’s not decreasing the file size of your images and making your pages smaller?
Image File Size Comparison
Let’s compare a few .jpg images I pulled from Unsplash, a large, transparent .png of Facebook’s logo, a webpage screenshot & a photo I took from my smartphone. Notice the variation in file size between the .jpg images. Let’s see Optimus’ image compression in action. When evaluating the compressed image file sizes, I’m using the original image (not any of the thumbnail sizes).
The WebP % Smaller column indicates the percentage reduction from the original image to the WebP version.
| Image | Image Description | Original File Size | Optimus Compressed File Size | % Saved | WebP File Size | WebP % Smaller |
|---|---|---|---|---|---|---|
| test-1.jpg | 1920×1280 photograph | 952kb | 926kb | 3% | 530kb | 44% |
| test-2.jpg | 6000×4000 photograph | 3.7mb | 3.7mb | — | — | — |
| test-3.png | 1024×1024 transparent png | 13kb | 11kb | 15% | 7kb | 46% |
| test-4.jpg | 1213×842 website screenshot | 165kb | 143kb | 13% | 67kb | 59% |
| test-5.jpg | 3264×1836 smartphone photograph | 1.3mb | 1.2mb | 8% | 469kb | 64% |
As you can see, there were savings in 4 of the 5 images. The smallest savings came from the images on Unsplash, but that’s likely because they are already compressed, and might not have any EXIF data associated with them. Therefore, Optimus has less to remove.
We saw a nice savings on the large .png image, and decent savings on the web screenshot & the smartphone photo.
The WebP files are where this plugin really shines. On average, the image’s file size was cut in half.
No WebP file was created for the original test-2.jpg file, but .webp files were created for test-2.jpg’s thumbnails. I’m not sure what happened here, but you’ll also notice there was no reduction in file size for the .jpg file either. For all the thumbnail variations of test-2.jpg, the WebP files were at least 33% smaller than their JPG counterparts.
Expectations
The reduction in file size is about what I expected from a WordPress image compression plugin. But I think the real value with Optimus comes in the creation of WebP files. These are all significantly smaller in file size, and provide much faster loading times for these images.
Optimus Plugin – Final Thoughts
The Optimus plugin provides a simple, cost-effective way to increase your page speed by compressing your WordPress images. I don’t see any downside to using a plugin like Optimus, and for a small fee, I think it’s worth paying for the pro version (Optimus HQ) to get the WebP conversion.
Optimus image
compression; a no brainer.
WebP for the win.
Download the free plugin from the WordPress repository, or purchase the pro version from the Optimus website.
- 1 site = $29/yr (on sale for $19)
- Unlimited sites = $149/yr (on sale for $99)
*Prices valid as of March 2016