Do you currently use Twitter Ads to market your products or services? Have you thought about increasing your social media presence?
Twitter Ads are a great way to increase your reach. You can run a campaign to gain more followers, drive traffic to your website or promote your most popular tweets.
Twitter Ads comes with lots of targeting options built-in, but there’s one thing you can do to segment your audience even further. Twitter remarketing allows you to target ads to people who have visited your website, or taken a certain action on your site. Before you can target ads to these people, you need to add a Twitter website tag to your website. Let’s walk through how to do that.
This tutorial is for adding a UNIVERSAL Twitter website tag that appears on every page of your site. If you’re looking to create a tag for a single event, pageview, purchase, etc., I’ll be creating another tutorial on that soon.
Add a Twitter Website Tag to your Site
- Login to your Twitter account
- Click on your profile image, and go to Twitter Ads

- Go to Tools > Conversion tracking
![]()
- On the right, under “How to Start,” check the box to agree to Twitter’s advertising policy
- Click Generate website tag for conversion tracking

- Copy the website tag to your clipboard

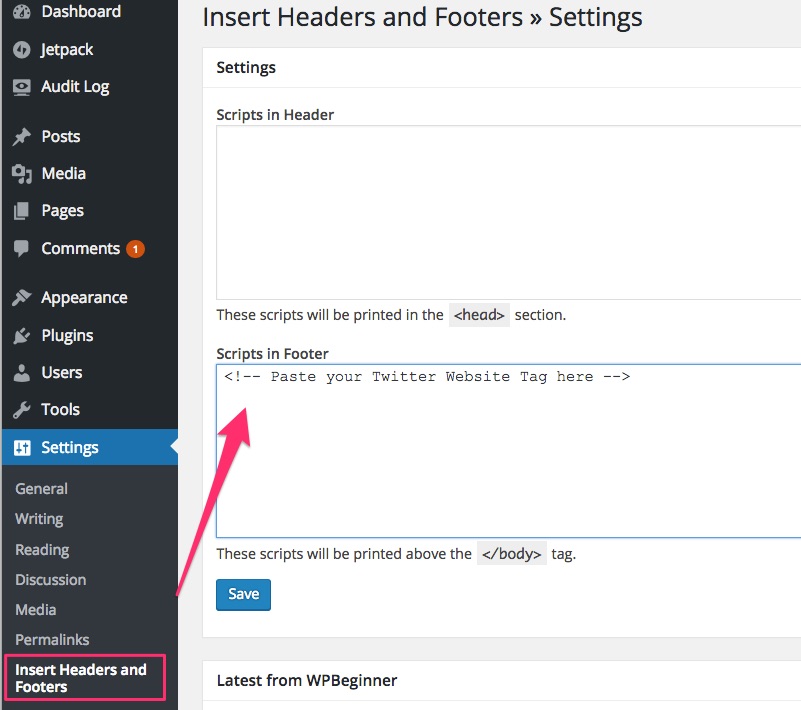
Add Twitter Website Tag using a WordPress Plugin
- Install & activate the Insert Headers and Footers WordPress plugin
- Go to Settings > Insert Headers and Footers
- In the Scripts in Footer section, paste your Twitter website tag
Add Twitter Website Tag with Google Tag Manager
This assumes you already have Tag Manager installed on your website. If not, check out my tutorial on How to Install Google Tag Manager on WordPress.
- Login to your Google Tag Manager account
- Click on your container
- Click Add a new tag
- Give it a name. I recommend “Twitter Universal Website Tag”
- Choose Custom HTML Tag
- Under Configure Tag, paste your Twitter website tag into the box
- Under Fire On, choose All Pages
- Click Create Tag
- Don’t forget to publish your container when you’re done
Add Twitter Website Tag to your WordPress Theme
- In your active WordPress theme, open the
footer.phpfile - Locate the
</body>tag - Paste the Twitter website tag just above the
</body>tag
NOTE: If you switch WordPress themes in the future, be sure to copy this and place it in your new theme, otherwise it’ll stop working. I recommend using Google Tag Manager or a WordPress plugin instead.
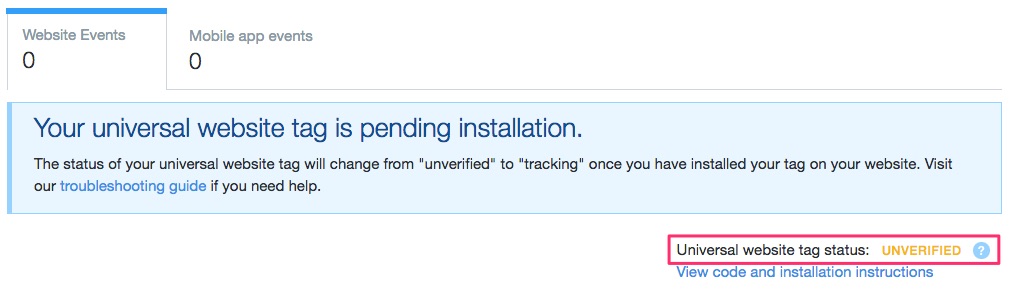
Verify your Twitter Website Tag is Installed & Tracking
After you’ve installed your tag, you’ll want to make sure it’s tracking properly. Wait a few hours, and then return to your Tools > Conversion Tracking page in the Twitter Ads dashboard. Look to see if your tag is Unverified or Tracking. If it’s been more than 24 hours, and you’ve been receiving traffic on your website, and it still says “Unverified,” see the troubleshooting guide.
Twitter Website Tag Video Tutorial
I hope you enjoyed this tutorial on how to add the Twitter website tag to your site. If you have any trouble, please let me know in the comments.
We Recommend
https://kinsta.com › wordpress-hosting
Fast and secure infrastructure, worldwide CDN, edge caching, 35 data centers, and enterprise-level features included in all plans. Free site migrations.
https://gravityforms.com › features
Create custom web forms to capture leads, collect payments, automate your workflows, and build your business online. All without ever leaving WordPress.
Leave a Comment