If you’re reading this article, you’ve probably heard that having an SSL certificate for your website is quickly becoming a necessity. Regardless of whether you’re running an ecommerce site, personal blog, business site, or any other type of site, an SSL certificate is something you should seriously consider.
There are many ways to install an SSL certificate on a WordPress website. In this article, I’ll be covering how to install an SSL on WP Engine’s hosting platform.
Read: Complete WP Engine Review Including All Features
WP Engine is a popular managed WordPress hosting company that offers free SSL certificates via Let’s Encrypt. Free SSLs come included with every WP Engine plan, and they are easy to setup. Let’s walk through how to set one up.
[adrotate banner=”91″]
Video Tutorial
WP Engine SSL Options
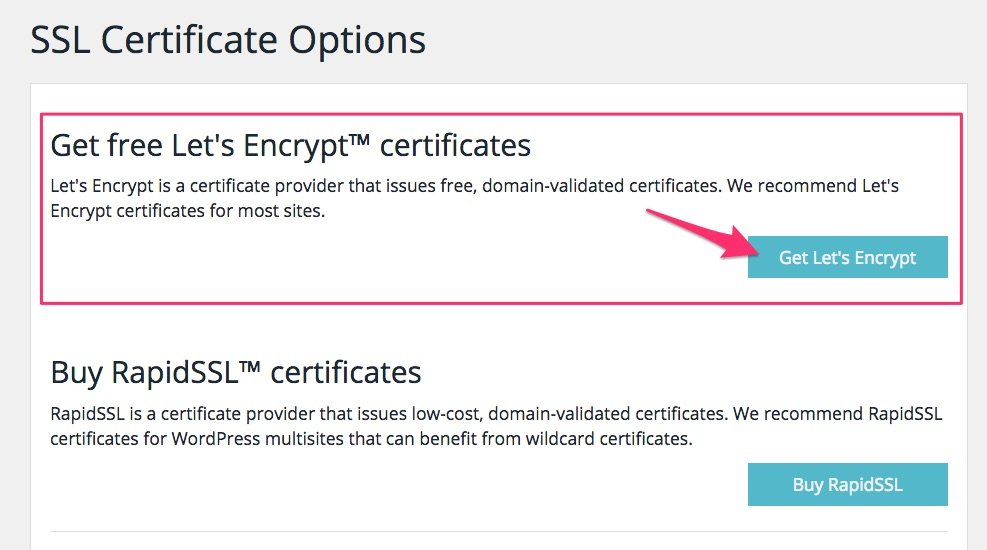
![]() There are several different types of SSLs that WP Engine offers. Let’s briefly explain each:
There are several different types of SSLs that WP Engine offers. Let’s briefly explain each:
- Free SSL via Let’s Encrypt
- Let’s Encrypt is a certificate provider that issues free, domain-validated certificates. WP Engine recommends Let’s Encrypt certificates for most sites, as do I.
- Buy a RapidSSL Certificate
- RapidSSL is a certificate provider that issues low-cost, domain-validated certificates. WP Engine has partnered with RapidSSL to allow you to purchase them directly from your control panel. They cost either $49/yr or $199/yr, depending on the type. If you run WordPress multisite and need an SSL for many sub-domains, you’ll want to pay $199/yr for a wildcard certificate.
- Import a New Certificate
- If you prefer to use your own SSL certificate, WP Engine will help you install it. This option is recommended for large ecommerce sites that handle 100+ transactions/day, or anyone in need of Extended Validation certificates.
- Import an Existing Certificate
- If you already have an SSL certificate and private key, WP Engine will help you migrate it over to their platform. This option is recommended when migrating an existing WordPress site that already has a working SSL cert.
For most WordPress sites, the easiest & most cost-effective option is the Free Let’s Encrypt SSL.
Install Free SSL on WP Engine
Everything will take place within your WP Engine control panel at my.wpengine.com.
Find the website in the control panel
- Click on “Installs” in the top navigation
- Click on the install that you want to add an SSL to
- Click on “SSL” in the left sidebar to access the SSL options for that site

Request & Install the SSL
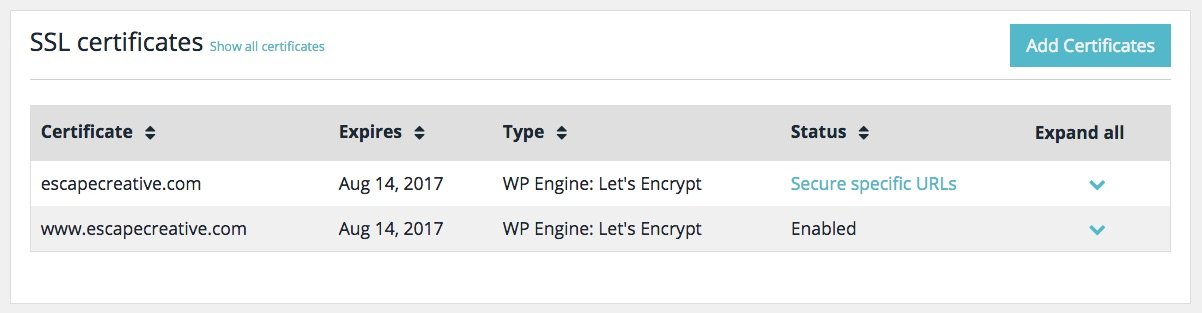
- Look for the “SSL certificates” section
- Click the “Add Certificates” button

Like we mentioned earlier, there are multiple ways to add your SSL with WP Engine. But we’re going to choose the Free Let’s Encrypt certificate.
- Click the “Get Let’s Encrypt” button
Final SSL Setup
There are a few final options before you submit your SSL request.
- Domain: If you have more than one domain added to your WP Engine account, you technically only need to select the domain that you are actively using (typically, this is either the www version or the non-www version). But it doesn’t hurt to grab an SSL for both.
- Terms & Conditions: Read and agree to the terms and conditions.
- Click the Request SSL Certificate button

You’ll see a confirmation page that let’s you know your free WP Engine SSL is being installed. In my experience, this has taken as little as 10 minutes, and as long as 3 hours. You’ll receive an email from their support team when the SSL has been installed.
SSL Certificate Options
Once you’re free WP Engine SSL certificate has been installed, there are a few more steps before your site is actually using it. Let’s go over the options on how you want to set things up.
- Click the dropdown arrow to open up the SSL for the version of your domain that you are using
- Let’s go over these options
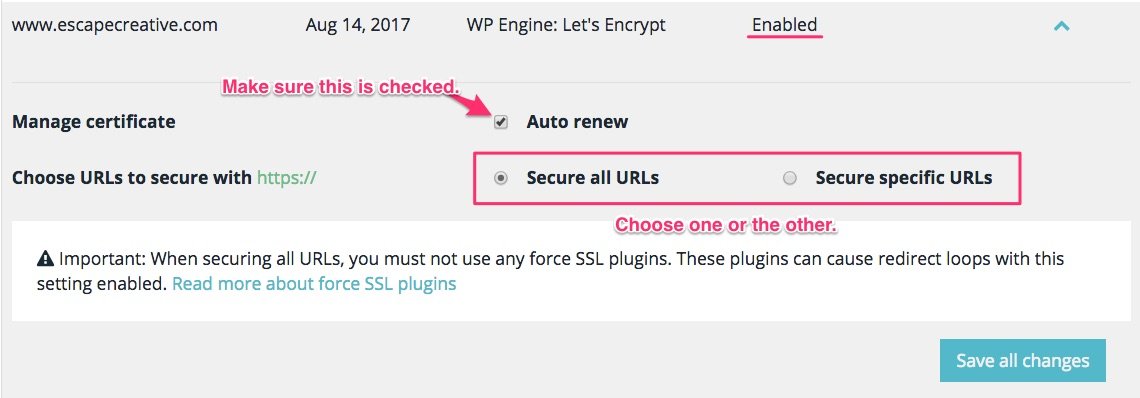
- Auto renew: This should be checked by default, but it doesn’t hurt to double-check. You’ll definitely want to auto-renew your SSL.
- Choose URLs to secure with https: You have two options…
- Secure all URLs (highly recommended): This will serve your entire site over https.
- Secure specific URLs: Just like it says, you’ll be able to pick & choose which pages of your site to load over https.
99% of you will want to secure all URLs. If you don’t know which option to choose, definitely just secure all URLs.
There are a few more options at the top of the page.
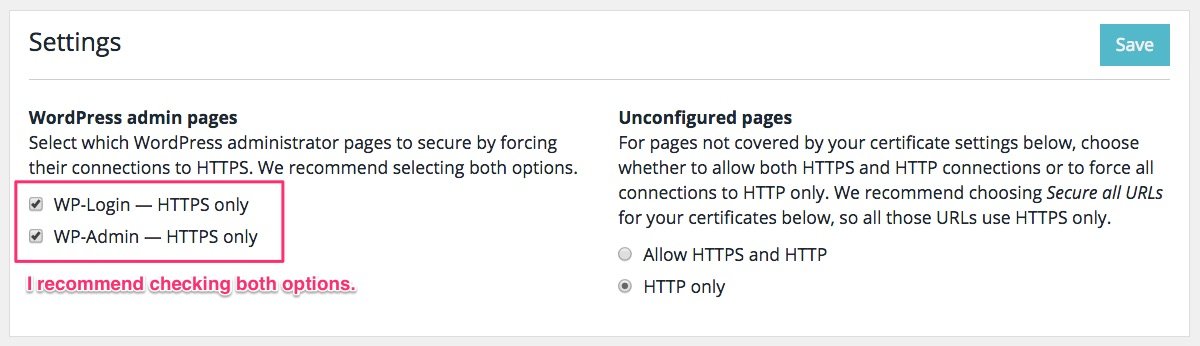
When you choose to “secure all URLs,” it only refers to the public-facing pages on your website. These settings allow you to control whether or not to use https for your login & admin pages.
Unconfigured pages: This only applies if you choose to secure only certain URLs. Because I highly recommend securing all URLs, this option is irrelevant.
Your site should now be using WP Engine’s free SSL via Let’s Encrypt, and all pages on your site should be loading via https. Navigate to your site in a browser, and you should see something similar to this:
![]()
This is how Google Chrome displays a secure site that is using a valid SSL certificate. Each browser (Firefox, Internet Explorer, Edge, Safari) might look slightly different, but you want to look for a few things:
- https, not http
- a padlock icon
- green text
Some combination of those things will be used to indicate your WP Engine SSL is setup correctly.
[adrotate banner=”91″]
Benefits of a Free WP Engine SSL
Most of you are probably already aware of the benefits for using an SSL on your website, but I’ll quickly mention why it’s important.
- Increased security for you: Securing your login & admin pages will encrypt your username & password when you login to your site. So if you’re using a free wifi connection, working from Starbucks, etc., it becomes much harder for a hacker to steal your password and potentially gain access to your admin area.
- Increased security for your visitors: If your site provides any way for users to submit information (contact forms, blog comments, checkout pages, etc.), using an SSL encrypts all the information they send to you. If a hacker tried to intercept it, all the data would be encrypted, and the hacker couldn’t use it for any nefarious behavior.
- Better search rankings on Google: Google made it public back in 2014 that they would begin using HTTPS as a signal in their search ranking algorithms. No one knows just how much of a boost you’ll get, but everything else being equal, you can bet Google will rank the https website above the non-secure one.
If you have any trouble setting up a free SSL with WP Engine, please let me know in the comments so I can help you out.
We Recommend
https://kinsta.com › wordpress-hosting
Fast and secure infrastructure, worldwide CDN, edge caching, 35 data centers, and enterprise-level features included in all plans. Free site migrations.
https://gravityforms.com › features
Create custom web forms to capture leads, collect payments, automate your workflows, and build your business online. All without ever leaving WordPress.
Leave a Comment